
Introduction
Version scope
This guide targets Umbraco 8 on ASP.NET Web API 2 and the classic .NET Framework stack. Newer Umbraco versions use ASP.NET Core and should be configured differently.
Understanding CORS in Umbraco and Azure
While developing against an Umbraco API, you may run into CORS policy errors when the browser application and the API are hosted on different origins. A common example is an Angular application running locally while calling an Umbraco API hosted on another domain or in Azure App Service.
The solution has two parts: configure CORS correctly in the Umbraco 8 Web API application and, if you use Azure App Service CORS, configure the allowed client origins there as well.
The CORS Policy Problem I Faced
I ran into this while retrieving data from an Umbraco API endpoint from a local Angular application. The browser returned the following error:
Access to XMLHttpRequest at ‘http://testapi.piotrbach.com/umbraco/API/showcase/getdummydata’ from origin ‘http://localhost:4200’ has been blocked by CORS policy: Response to preflight request doesn’t pass access control check: It does not have HTTP ok statusThis usually means the preflight request did not receive the CORS response the browser expected.
Why CORS Issues Arise
Browsers apply the same-origin policy to protect users from a page on one origin reading data from another origin without permission. CORS allows the API server to explicitly declare which cross-origin requests are allowed.
An origin is defined by its scheme, host, and port. For example, http://localhost:4200 and https://api.example.com are different origins, so a browser request between them is cross-origin.
Some requests trigger a preflight OPTIONS request before the browser sends the actual API call. If the API does not return an acceptable CORS response, the browser blocks the request.
Setting Up CORS in Umbraco 8
1. Install the ASP.NET Web API CORS package
Install the CORS package through NuGet:
Install-Package Microsoft.AspNet.WebApi.Cors2. Enable CORS in the Umbraco 8 Web API pipeline
Umbraco 8 uses composers and components for application startup. The following component enables Web API CORS:
[RuntimeLevel(MinLevel = RuntimeLevel.Run)]
internal class WebApiCorsComposer : IComposer
{
   public void Compose(Composition composition)
   {
      composition.Components().Insert<WebApiCorsComponent>();
   }

   public class WebApiCorsComponent : IComponent
   {
      public void Initialize()
      {
         GlobalConfiguration.Configuration.EnableCors();
      }

      public void Terminate()
      {
      }
   }
}
3. Configure CORS on the API controller
You can apply EnableCors at action, controller, or global scope. For example:
[EnableCors(origins: "*", headers: "*", methods: "*")]
public class ShowcaseApiController : UmbracoApiController
{
    [HttpGet]
    public IHttpActionResult GetDummyData()
    {
        return Json("ok");
    }
}
Production note
origins: "*" allows browser requests from any origin. For a production API, prefer the specific frontend origins that need access, for example https://www.example.com.
4. Allow the required headers and methods
The original setup also configured the expected HTTP methods and request headers:
<httpProtocol>
      <customHeaders>
        <remove name="X-Powered-By" />
        <remove name="Server" />
        <add name="Access-Control-Allow-Methods" value="GET, POST, OPTIONS, PUT, PATCH, DELETE, HEAD" />
        <add name="Access-Control-Allow-Headers" value="Origin, X-Requested-With, Accept, Authorization, Content-Type" />
      </customHeaders>
</httpProtocol>
Alternatively, define the CORS policy globally in code:
var cors = new EnableCorsAttribute(origins: "*",
   headers: "Origin, X-Requested-With, Accept, Authorization, Content-Type",
   methods: "GET, POST, PUT, DELETE, OPTIONS");

GlobalConfiguration.Configuration.EnableCors(cors);
The complete Umbraco 8 component then looks like this:
[RuntimeLevel(MinLevel = RuntimeLevel.Run)]
internal class WebApiCorsComposer : IComposer
{
   public void Compose(Composition composition)
   {
      composition.Components().Insert<WebApiCorsComponent>();
   }

   public class WebApiCorsComponent : IComponent
   {
      public void Initialize()
      {
         var cors = new EnableCorsAttribute(origins: "*",
            headers: "Origin, X-Requested-With, Accept, Authorization, Content-Type",
            methods: "GET, POST, PUT, DELETE, OPTIONS");

         GlobalConfiguration.Configuration.EnableCors(cors);
      }

      public void Terminate()
      {
      }
   }
}
Keep the configuration in one place when possible
ASP.NET Web API 2 supports action-, controller-, and global-level CORS policies. Use the narrowest policy that matches your API instead of allowing every origin, method, and header by default.
Final Step: Enable CORS for Azure App Service
If you choose to use Azure App Service CORS, add the browser application's origin to the allowed origins list. For local Angular development, that might be:
http://localhost:4200The basic steps are:
Open your App Service in the Azure portal.
Open the CORS configuration for the app.
Add the exact frontend origin.
Save the configuration.
Retest the browser request and its preflight request.
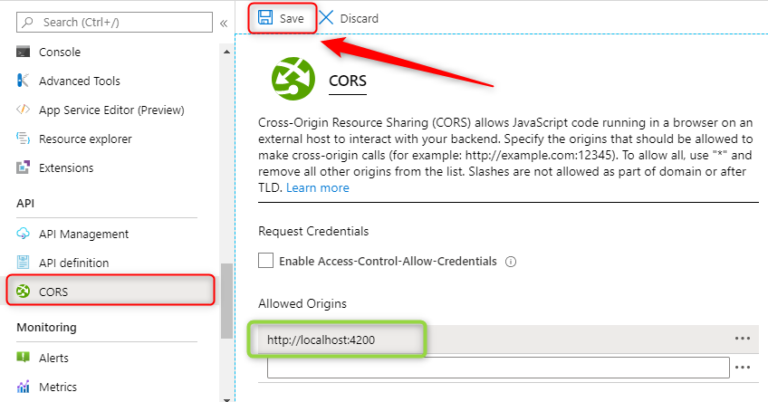
Enabling Cors for Azure App Service
Do not configure CORS twice
Azure App Service documentation notes that App Service CORS takes precedence over application-level CORS. If you use App Service CORS, avoid maintaining a second competing CORS policy in the application unless you have a specific reason and understand which layer will respond.
Azure also supports * as an allowed origin, but that means any website can make browser-based cross-origin calls to the API. Use explicit origins for production whenever possible.
Official References
Conclusion
CORS errors in an Umbraco 8 API are usually straightforward once you separate the problem into the browser origin, the Web API CORS policy, and the Azure App Service configuration.
Enable CORS at the appropriate scope, allow only the origins, headers, and methods the client actually needs, and avoid competing application-level and App Service CORS configurations.


