
Quick answer
To temporarily disable ReSharper in Visual Studio, open Tools > Options > ReSharper and select Suspend.
To turn it back on, return to the same page and select Resume.
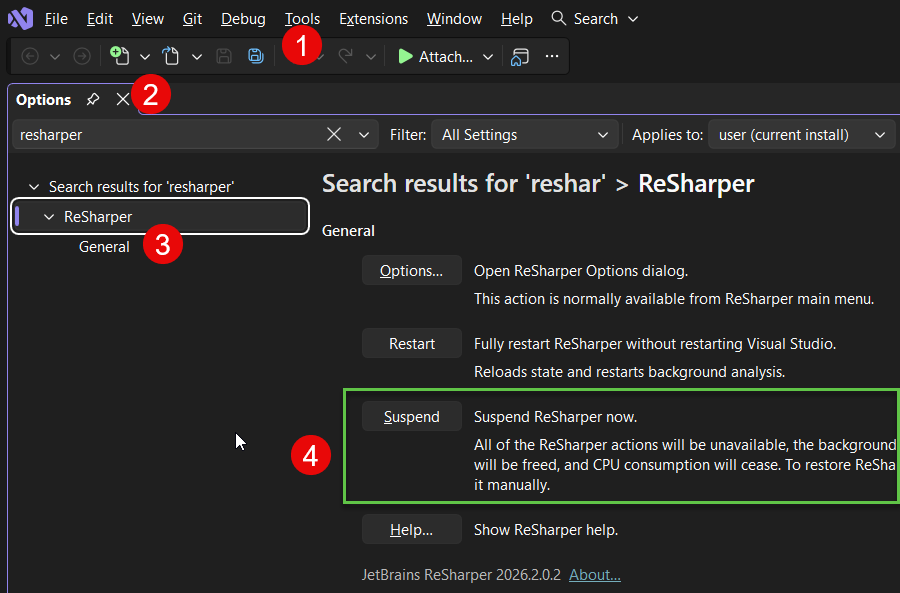
Visual Studio 2026 → Tools → Options → ReSharper
Goal | Action |
|---|---|
Temporarily disable ReSharper | Tools > Options > ReSharper > Suspend |
Turn ReSharper back on | Tools > Options > ReSharper > Resume |
Toggle it frequently | Assign a shortcut to |
Diagnose slow Visual Studio | Suspend ReSharper and compare the same workflow |
Keep ReSharper but reduce UI impact | Test Out-of-Process mode and reduce analysis scope |
How to Temporarily Disable ReSharper
The quickest way to stop ReSharper without uninstalling it is to suspend the product. This is useful when you want to free resources temporarily or test whether ReSharper contributes to a Visual Studio performance issue.
1. Open Visual Studio Options
In Visual Studio, select:
Tools → Options2. Open the ReSharper page
Find ReSharper in the Options dialog. You can also use the Options search field to locate the page quickly.
3. Select Suspend
Click Suspend. ReSharper is unloaded from Visual Studio while remaining installed.
Quick path:
Tools → Options → ReSharper → Suspend
4. Close the Options dialog
Continue working normally. ReSharper stays suspended until you resume it.
How to Re-Enable ReSharper
Open Tools > Options.
Select ReSharper.
Click Resume.
Close the Options dialog.
Tools → Options → ReSharper → Resume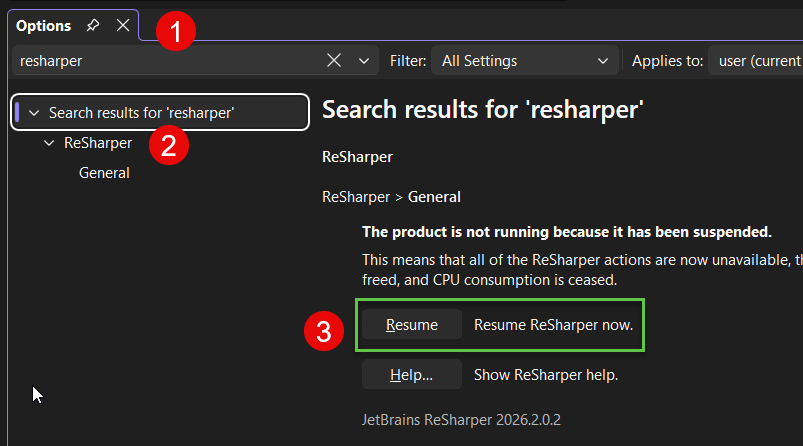
Add a Keyboard Shortcut to Toggle ReSharper
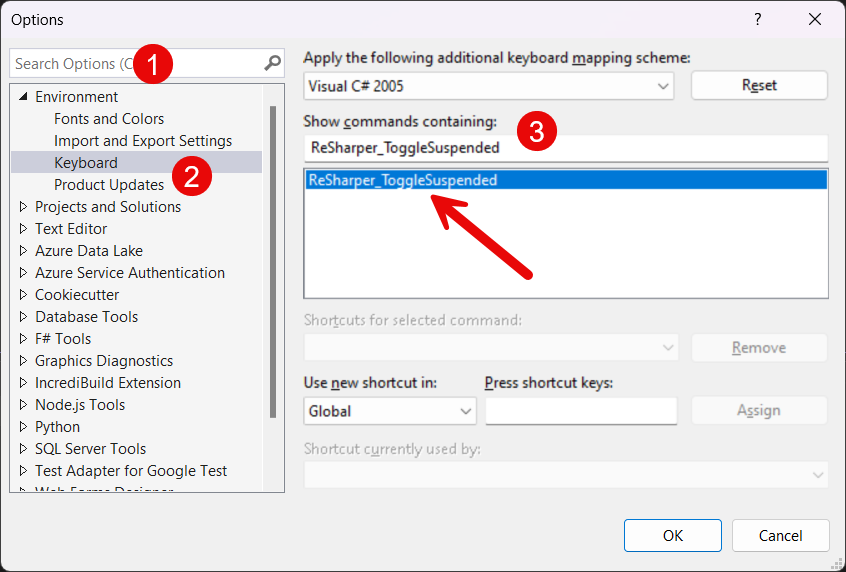
If you switch ReSharper on and off regularly, navigating through Options every time is unnecessary. ReSharper exposes the Visual Studio command:
ReSharper_ToggleSuspended
Open:
Tools → Options → Environment → KeyboardSearch for ReSharper_ToggleSuspended, select the command, choose an unused key combination, and assign it. The same shortcut toggles between running and suspended states.
Should You Disable ReSharper If Visual Studio Is Slow?
Not automatically. A slow IDE can have many causes: extensions, analyzers, solution size, generated code, build processes, available memory, or the project itself.
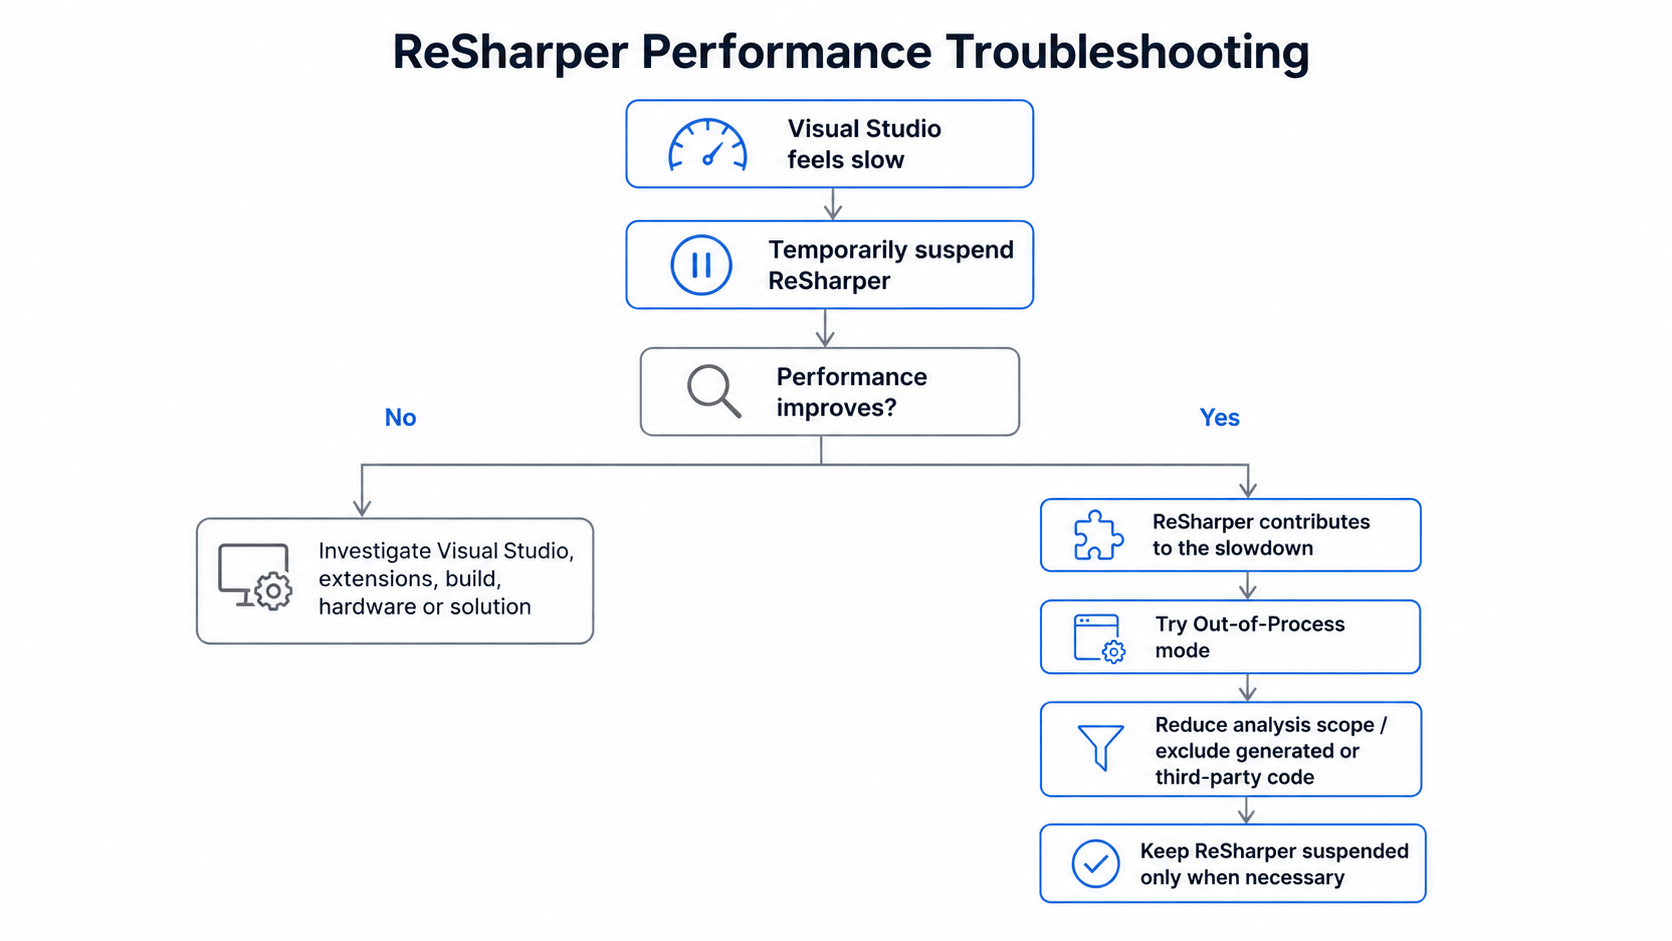
A better engineering approach is to use Suspend Now as an A/B diagnostic test.
Identify the exact behavior that feels slow: typing, navigation, startup, indexing, or UI responsiveness.
Suspend ReSharper.
Repeat the same workflow.
Compare the result.
If the problem largely disappears, ReSharper is probably contributing to the workload. If little changes, investigate other causes instead of spending time tuning ReSharper.
Try Out-of-Process Mode Before Giving Up ReSharper
Modern ReSharper versions provide an Out-of-Process mode that can move substantial analysis work into a separate process instead of doing everything inside Visual Studio.
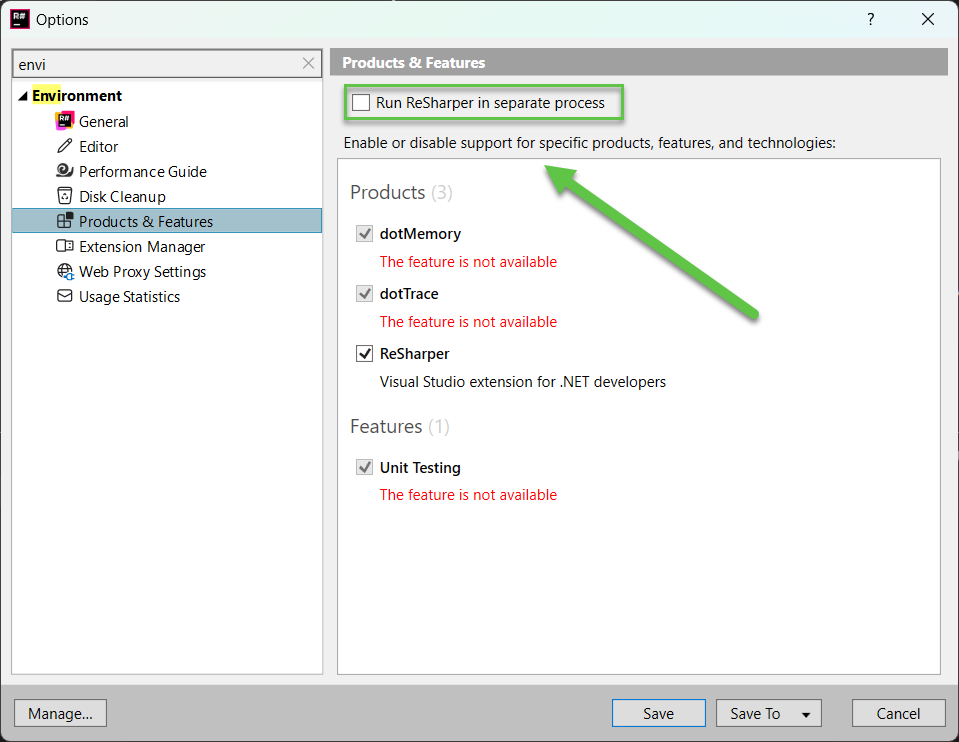
Check the current ReSharper configuration under:
ReSharper → Options → Environment → Products & FeaturesLook for Run ReSharper in separate process. After switching modes, ReSharper reinitializes.
Production note
Out-of-Process mode can have feature differences depending on the ReSharper version. Validate the current feature set before standardizing it across a team.
Reduce ReSharper Work Instead of Disabling It
Review solution-wide analysis
Whole-solution analysis is useful, but it also adds processing work. If you do not need continuous analysis across the entire solution, review the corresponding ReSharper code inspection settings.
Exclude code you do not actively maintain
Large repositories often contain generated code, third-party sources, or projects that developers rarely edit. Excluding unnecessary areas from analysis can be a better long-term optimization than suspending ReSharper across the entire solution.
Clear caches only when there is a reason
Cache cleanup can be useful after upgrades or when behavior strongly suggests stale analysis data. It should not become a routine ritual for every slowdown.
Suspend vs Disable vs Uninstall ReSharper
Action | Installed | Easy to reverse | Best use |
|---|---|---|---|
Suspend | Yes | Yes | Temporary disable or performance diagnosis |
Reduce analysis | Yes | Yes | Keep useful features with less workload |
Out-of-Process mode | Yes | Yes | Reduce Visual Studio UI pressure |
Disable extension | Yes | Usually | Stop the extension from loading |
Uninstall | No | Requires reinstall | You no longer want ReSharper |
For a temporary issue, Suspend is normally the right choice.
ReSharper Does Not Resume: Troubleshooting
Open Tools > Options > ReSharper and verify whether ReSharper is suspended.
If it is suspended, select Resume.
If it appears active but behaves incorrectly, try one suspend/resume cycle.
Check licensing and installation status if ReSharper still does not load.
Use the current JetBrains documentation for version-specific recovery steps
Frequently Asked Questions
Can I temporarily disable ReSharper without uninstalling it?
Yes. Use Tools > Options > ReSharper > Suspend. ReSharper remains installed and can be resumed later.
How do I turn ReSharper back on?
Open Tools > Options > ReSharper and select Resume.
Can I disable ReSharper with a keyboard shortcut?
Yes. In Tools > Options > Environment > Keyboard, assign a shortcut to ReSharper_ToggleSuspended.
Will disabling ReSharper make Visual Studio faster?
It can if ReSharper is contributing significantly to the workload. Suspend it temporarily and repeat the same operation to determine whether the difference is meaningful.
Should I uninstall ReSharper if Visual Studio is slow?
Usually not as the first step. Suspend it first, then consider Out-of-Process mode, solution-wide analysis settings, and unnecessary analysis scope.
Can I reduce analysis without disabling ReSharper?
Yes. ReSharper allows you to tune code inspection behavior and reduce or exclude analysis for parts of a solution you do not need continuously inspected.
Official References
Conclusion
Temporarily disabling ReSharper remains straightforward:
Tools → Options → ReSharper → SuspendTo restore it, use Resume. If you toggle frequently, assign a keyboard shortcut to ReSharper_ToggleSuspended.
When performance is the reason, treat suspension as a diagnostic step rather than the final solution. If Visual Studio becomes noticeably more responsive, test Out-of-Process mode and reduce unnecessary analysis before giving up ReSharper entirely.


